Are your sublimated designs look inverted on substrates and wonder “do you mirror sublimation images” to print them correctly on substrates? Sublimation printing, with its vibrant colors and permanent transfers, seems magical… until you stumble upon the mysterious topic of “mirroring.” Do you really need to do it?
Yes, mirroring sublimation images is necessary because of the heat transfer process involved in sublimation printing. When an image is sublimated on the substrate, it turns out flipped. Therefore, mirroring images is important, otherwise the final results will look inverted or backward after heat transfer process.
Mirroring sublimation images is a crucial step for most sublimation projects. It involves flipping or reversing the image horizontally before printing it on the sublimation paper. This way, the image will appear correctly on the final product after the heat transfer process. But why do you need to mirror sublimation images?
Let’s start with the basics. Sublimation printing uses heat to transfer dyes from a special paper onto various surfaces, like mugs, t-shirts, and yes, even paper! But here’s the catch: the image gets flipped during the transfer process. Think of it like a mirror image.
So, if you don’t mirror your design beforehand, your text will be backwards, your arrows will point the wrong way, and your carefully crafted logo will appear different.
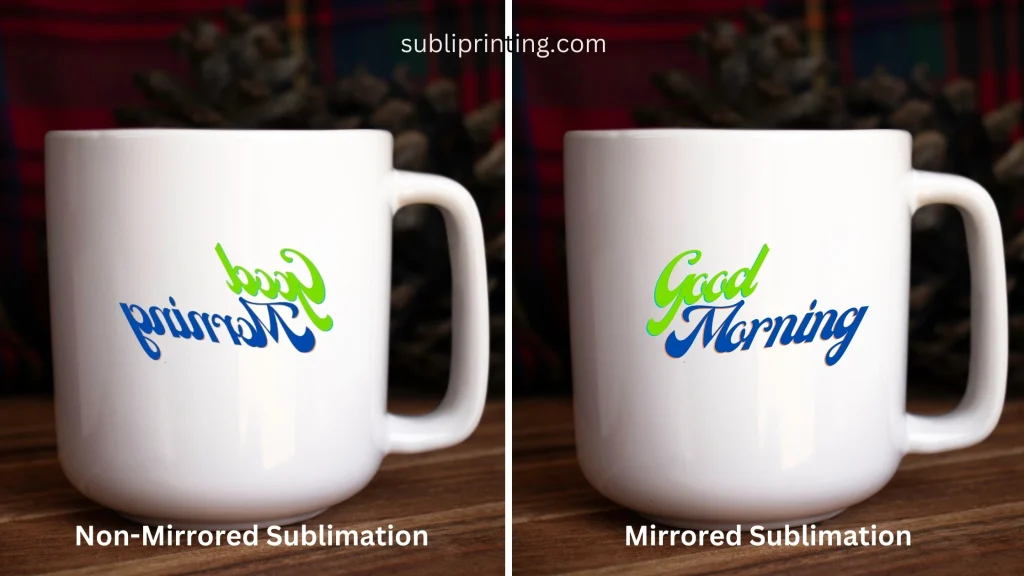
For example, if you want to print a sublimation mug with the word “Hello” on it, you need to mirror the image on the paper, so that the word “Hello” appears correctly on the mug. If you don’t mirror the image, the word “Hello” will be reversed on the mug, and it will look like “ollɘH”.
When to Mirror Images for Paper Sublimation?
Well, mirroring sublimation is crucial for almost for every image, unless it is a random splash! Moreover, the substrates are no exception, whether it is a coffee mug, a t-shirt, tote bag, tumbler, etc. Here are some examples to elaborate it more:
1. Images with Text
One of the most obvious cases where you need to mirror your images for paper sublimation is when your design has text. And as we know words are the leading star of the sublimation world, they demand a little extra attention.
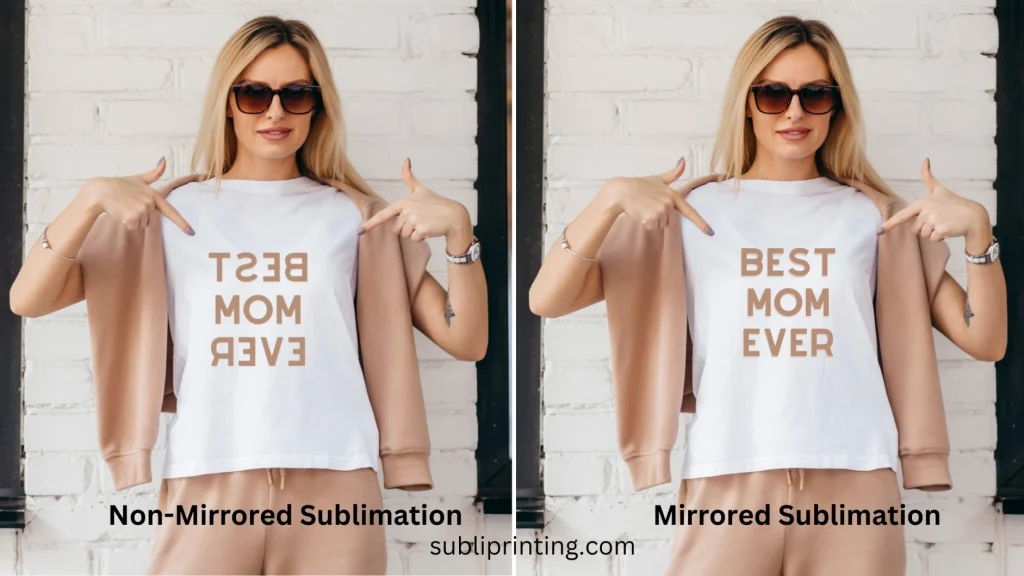
Let me share one tragic experience of the early days of my sublimation journey. I was designing a summer shirt for my mom with a heartfelt note (“To the best mom ever!”). I forgot to mirror text and discovered that the final result on the t-shirt looked like (“!ɿɘvɘ mom Ɉƨɘd ɘʜɈ oT”) upon transfer. Indeed, it wasn’t a warm-and-fuzzy feeling I was hoping for!
After that, to avoid such cringe-worthy scenarios, I made mirroring my go-to move for any design that boasts words, quotes, or even fancy fonts.
2. Designs with Directional Elements
Another important case where you need to mirror your images for sublimation is when your design has directional elements, such as arrows, patterns, or logos. Directional elements have a specific orientation that needs to be preserved on the final product. If you don’t mirror your directional elements, they will appear incorrectly on the substrate, and they will lose their meaning and impact.
Imagine a t-shirt emblazoned with an inspirational arrow pointing to the belly button instead of the sky. Or a company shirt supporting a company logo that suddenly looks like a confused chameleon. Not exactly the message you were hoping to send. So, for any design element that relies on a specific direction, it has to be mirrored before sublimating on a substrate.
3. Personalized Images
Any design that has personalized images, such as photos, drawings, or signatures, needs to be mirrored to preserve the original orientation and perspective of the image.
Drawbacks of not Mirroring Sublimation
It is the most dissatisfying and irritating situation for me – forgetting to mirroring sublimation! That’s why I’m reminding you again to make it a habit. Let’s explore a practical insight on the drawbacks of not mirroring your sublimation images:
a. Wasted Time and Materials
Sublimation transfers aren’t cheap, and time is precious. If you do not mirror your sublimation images, you will end up with a product that does not match your original design, and that you may not be able to use or sell.
You will also waste your sublimation paper, ink, substrate, and electricity, as you will have to reprint and retransfer your image. This will be costly and frustrating, especially if you are working on a large or complex project.
Trust me, the frustration of peeling off a perfectly-printed-but-backwards design is enough to make me cry into my cup of coffee.
b. Unsatisfied Customers
No one wants to be known as the crafter who produces shirts with reverted text or mugs with scrambled logos. Not mirroring can damage your reputation and scare off potential customers. This can lead to a loss of business and reputation. Trust me, a reputation for flipped text is not the kind of legacy you want to leave behind.
How to Mirror Sublimation Images?
Now that you know why and when you need to mirror sublimation images, you may wonder how to do it. Fortunately, there are different methods that you can use to mirror your images, depending on the software and printer that you are using.
Let’s explore how to mirror sublimation images using common methods:
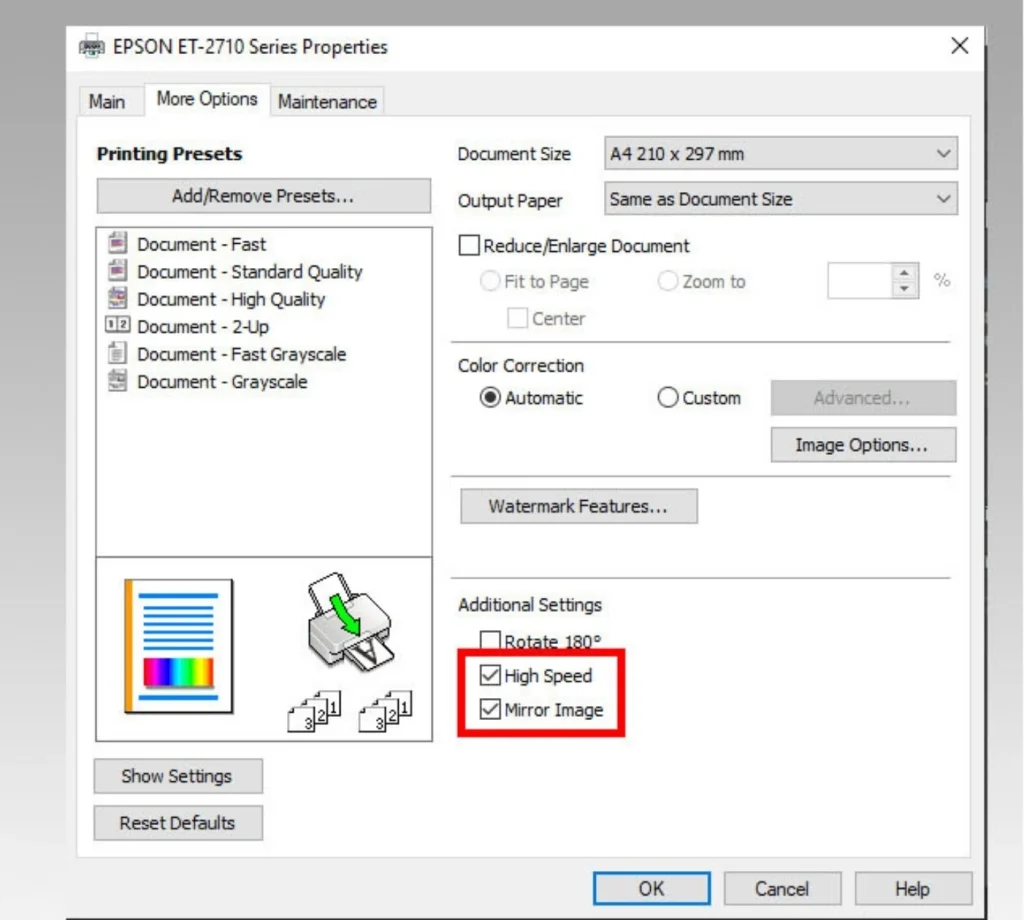
1. How to Mirror Sublimation Images on Epson Printer
If you are using an Epson printer for sublimation, there are two methods to mirror your images – let’s explore them:
Method 1: From the Printer’s Settings
Step 1: After connecting your Epson printer with your PC, go to “Devices and Printers”.
Step 2: Locate the printer that you would like to use for sublimation project.
Step 3: Right click on it and select “properties” > “printing preferences”.
Step 4: Locate the “Advanced” or “More Options” tab, depending on your model.
Step 5: Look for options like “Flip horizontally” or “Mirror image.”
Step 6: Check the mirroring box!
That’s it, your Epson printer is now ready to print sublimation images in mirror format.
Method 2: From Printing Box
Step 1: Open the image you want to print in your preferred image editing software.
Step 2: Click on the “Print” option in the software, or use the keyboard shortcut “Ctrl+P” (Windows) or “Command+P” (Mac).
Step 3: In the Print dialog box, select your Epson printer from the list of available printers.
Step 4: Click on the “Properties” or “Preferences” button to access the printer settings.
Step 5: Under the “Print Effect Options”, select the “Mirror Image” option and click OK.
Step 6: Click on the Print button to print your mirrored image on the sublimation paper.
2. How to Mirror Sublimation Images on Photoshop
Step 1: Open your image that you want to sublimate in Photoshop.
Step 2: Select the image layer that you want to print by clicking on it.
Step 3: Go to the “Edit” menu and select “Transform”. Then, choose “Flip Horizontal”. Or, go to the “Image” menu. Select “Image Rotation” and then “Flip Canvas Horizontal.” (Depending on the version).
Step 4: You will see that your image is mirrored horizontally on the canvas.
Step 5: Save your file and print it on the sublimation paper.
3. How to Mirror Sublimation Images on Canva
Step 1: Upload your image to Canva.
Step 2: Click on the image to select it. A toolbar will appear at the top.
Step 3: Click on the “Edit” icon (the little wrench). Select “Flip horizontally.”
Step 4: You can either print it straight from Canva, or download it in .JPEG or .PNG format and print it using a sublimation printer.
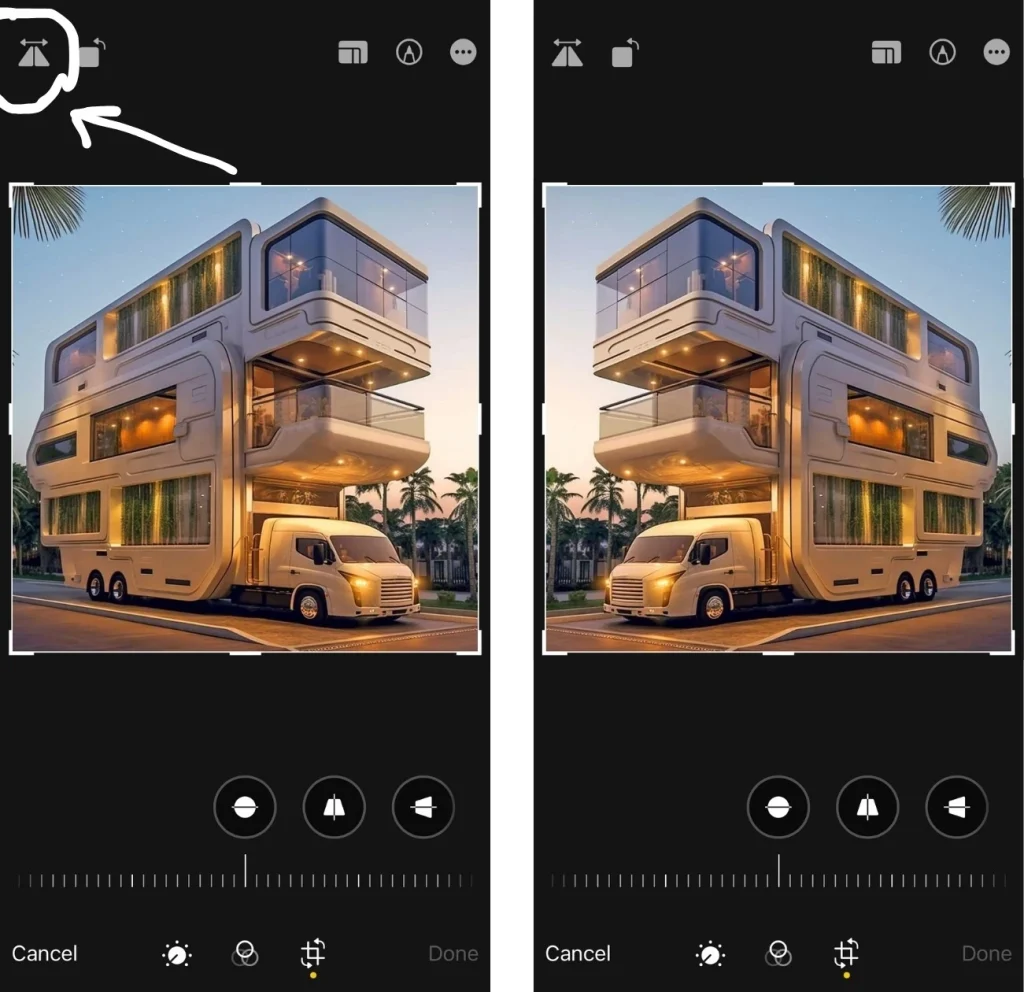
4. How to Mirror an Image on iPhone
Step 1: Open the “Photos” app and tap the image that you want to mirror.
Step 2: Tap “Edit” in the top-right corner of the screen.
Step 3: Tap the “Crop” icon in the bottom-right corner of the screen. It looks like a square with two arrows around it.
Step 4: Tap the “Flip” icon in the top-left corner of the screen. It looks like two triangles with a line between them.
Step 5: Tap “Done” to save the mirrored image.
Tips for Best Image Quality While Mirroring for Sublimation
Mirroring your images for sublimation is not enough to ensure a good quality and resolution of your final product. You also need to format your images properly, according to the type and size of your substrate, the color and brightness of your image, and the settings of your printer and sublimation software.
Here are some tips and tricks that I’ve learned over the years of experience:
Use high-resolution images: The higher the resolution of your image, the better the quality of your sublimation product. A low-resolution image will look pixelated and blurry when transferred to the substrate. A high-resolution image will look sharp and clear. A good rule of thumb is to use images that are at least 300 dpi (dots per inch) or higher.
Use the right color mode: The color mode of your image affects how your image will look on the substrate. There are two main color modes: RGB and CMYK. For sublimation, you should use the four-color ink system CMYK as it will produce more vibrant and accurate colors.
Format finesse: Save your mirrored image in a compatible format like JPEG or PNG. TIFF files might not play nice with your printer.
Do You Mirror Sublimation Vinyl?
Well, speaking of the personal experience – it depends! There are two main types of sublimation vinyl: adhesive sublimation vinyl and heat transfer sublimation vinyl.
Adhesive sublimation vinyl is a type of vinyl that has a sticky back, and can be applied to hard surfaces, such as mugs, signs, ornaments, etc. On the other hand, heat transfer sublimation vinyl has a heat-activated adhesive, and can be applied to soft surfaces, such as t-shirts, pillows, bags, etc.
The type of sublimation vinyl that you use determines whether you need to mirror your images or not. Generally:
Adhesive sublimation vinyl: You do not need to mirror your images for adhesive sublimation vinyl. This is because adhesive sublimation vinyl is heat transferred from the backside, like acrylic and glass.
Heat transfer sublimation vinyl: You need to mirror your images for heat transfer sublimation vinyl because heat transfer sublimation vinyl is heat transferred from the front side, like apparel and mugs.
Yes, you should mirror sublimation images before printing on sublimation paper. It is an essential part, otherwise your final design will look reverted on the substrates. You can skip the mirroring part if it is an abstract or splash design which does not have any directional element, or if you are using an adhesive sublimation vinyl. However, in all the other cases of sublimation, flip your image horizontally before printing.
Frequently Asked Questions
Do you have to mirror sublimation for tumblers?
Not always! It depends on the design elements and where you want them placed. For example:
Full wrap-around design: You might need horizontal mirroring for one side and vertical mirroring for the other to ensure text reads correctly and logos appear straight regardless of viewing angle.
Logo on one side: Mirror the logo if it has specific directionality (like an arrow).
Do I add bleed to sublimation?
Yes, adding a bleed is a good practice and I highly recommend it! A bleed is a slight extension of the design beyond the cut line. This extra margin accounts for any potential shifts during the sublimation process, ensuring that the image covers the entire intended surface. Adding bleed helps prevent white gaps or borders around the edges of your design, resulting in a more polished and professional-looking sublimated product.
My passion for colors and customizing items has led me to sublimation printing. Not only do I personalize my belongings, but also run a profitable business. After the experience of over a decade - I am glad to share my reviews on best sublimation printers, ink and the right software (I use). Read the guides and contact if you need any help regarding dye-sublimation or heat press.